At the Northern Utah WebSDR (link) we run a number of KiwiSDR receivers. These receivers, which are inherently broadband (10 kHz to 30 MHz) allow a limited number of users to tune across the bands, allowing reception on frequencies that are not covered by the WebSDR servers.
At present there are six of these receivers on site: Three are connected to the TCI-530 Omnidirectional antenna (covering 630-10 meters - 2200 meters is included via a separate E-field whip), two are on the east-pointing log-periodic beam antenna (which overs 40-10 meters) and the newest is connected to the northwest-pointing log-periodic beam antenna (which covers 30-10 meters).
 |
| Figure 1: Power supply in a PC case! The PC case housing the power supply was repurposed - because, why not? Click for larger version |
Up to this point we had been running 5 KiwiSDRs: Three of them were powered by a pair of 5 volt, 3 amp linear power supplies that are "dioded-ANDed" together to form a 6 amp power supply and the other two KiwiSDRs were powered from a heavily-filtered 5-volt, 3 amp switching power supply.
In recent months, the dual 3 amp linear supply had become problematic, not being able to handle the load of the three KiwiSDRs, so we had to power down KiwiSDR #3. With the recent installation of the northwest-pointing log periodic antenna, we were also looking toward installing another KiwiSDR for that antenna and we were clearly out of power supply capacity.
Using an ATX supply as a general-purpose power supply - it's not just the green wire!
If you look around on the Web, you'll see suggestions that you just "ground the green wire" to turn on an ATX supply, at which point you may use it as a general-purpose supply. While grounding the green wire does turn it on, it's not as simple as that - particularly if you leave the power supply unattended.
For example, what if there is a brief short on the output while you are connecting things, or what if the power browns out (or turns off) for just the "wrong" amount of time. These sorts of things do happen, and can "trip out" the power supply and it may never restart on its own.
With the site being remote, we couldn't afford for this to happen - so you'll see, below, how we remedied this.
Putting together another power supply:
With six KiwiSDRs, the power supply requirements were thus:
- 5 amps continuous, making the assumption that a KiwiSDR's average current consumption would be about 830 mA - a number with generous overhead.
- 9 amps on start-up, presuming that each KiwiSDR would briefly consume 1.5 amps upon power-up, again a value with a bit of overhead.
- The power supply must not exhibit a "slow" ramp-up voltage as the KiwiSDRs did not "like" that.
In looking around for a power supply on which to base the design, the obvious choice was an computer-type ATX power supply. Fortunately, I have on-hand a large number of 240 watt ATX supplies with active power factor correction which are more than capable of supplying the current demands, being rated for up to 22 amps load on the 5 volt supply - more than enough headroom as I would be needing less than half of that, at least with the currently-planned usage.
Circuit description:
Refer to the schematic in Figure 2 for components in the description.
Added filtering:
While these power supplies were already known to be adequately RF-clean (important for a receive site!) from their wide use for the WebSDR servers because we would be conducting the DC outputs outside the box - and to receivers - I felt it important that additional filtering be added. Having scrapped a number of PC power supplies in the past, I rummaged around in my box of random toroids and found two that had probably come from old PC power supplies, wound with heavy wire consisting of 4 or 5 strands in parallel. These inductors measured in the area 10s of microHenries, enough for HF filtering when used with additional outboard capacitance.
These filter networks were constructed using old-fashioned phenolic terminal lug strips. These consist of a row of lugs to which components are soldered - typically with one or two of the lugs used for mounting, and also "grounding". Rather than mount these lugs using a drill and screw, they were soldered to the steel case itself - something easily done by first sanding a "bare" spot on the case to remove any paint or oxide and then using an acid-core flux - cleaning it up afterwards, of course!
The heavier components (inductors, capacitors) were mechanically secured using RTV (silicone) adhesive to keep them from moving around - and to prevent the possibility of the inductor's wire from touching the case and chafing.
Looking at the schematic you may note that C202, C302, C501, C502 and C503 are connected to a "different" ground than everything else. While - at least for this power supply - the "Common" (black) wire is internally connected to the case, it's initially assumed that this lead - which comes from the power supply - may be a bit "noisy" in terms of RF energy, so they are RF bypassed to the case of the power supply. This may have been an unneeded precaution, but it was done nonetheless.
Connectorizing and wiring the power supply:
The ATX power connector was extracted from a defunct PC motherboard to allow the power supply itself to be replaced in the future if needed. On this connector, all of the pins corresponding with the 5 volt (red wires), 12 volt (yellow wires) and ground (black wires) were bonded together to form three individual busses and heavy (12 AWG) wires were attached to each: This was done to put as many of the wires emerging from the power supply in parallel with each other to minimize resistive losses.
The green wire (the "power" switch) and purple wire (the 5 volt "standby") were brought out separately as they would be used as well - and the remainder of the pins (3.3 volt, -12 volt, -5 volt, "power good", etc.) were flooded with "hot melt" glue to prevent anything from touching anything else that it shouldn't.
The 5 volt supply was split two ways - each going to its own L/C filter network (L501, L502, C502, C503, C504, C505) as shown in the schematic, this being done to reduce the total current through the inductor - both to minimize resistive losses, but also to reduce the magnetic flux in each inductor, something that could reduce its effective inductance.
Although I don't have immediate plans to use the 12 volt supply, a similar filter (L503, C506, C507) was constructed for the 12 volt supply lead. On the output side of the 12 volt filter, a 3 amp self-resetting thermal fuse (F501) was installed to help limit the current should a fault occur.
About the self-resetting fuses:
These fuses - which physically look like capacitors - operate by having a very low resistance when "cold". When excess current flows, they start to get warm - and if too much current flows, they get quite hot (somewhere above 200F, 100C) and their internal resistance skyrockets, dropping the current to a fraction of its original value: It's this current flow and their heat that keeps the resistance high.
It's worth noting that these fuses don't "disconnect" the load - they just reduce the current considerably to protect whatever it is connected to it. Since, when "blown", they are hot, they must be mounted "in the clear" away from nearby objects that could be damaged by the heat - and also to prevent lowering of their trip current by trapping heat or being warmed by another component - such as another such fuse.
It should be noted that if the outputs - either 5 or 12 volts - are "hard shorted", the thermal fuse may not react quickly enough prevent the power supply from detecting an overcurrent condition and shutting down. As an output short is not expected to be a "normal" occurrence, this behavior is acceptable - but it will require that the power supply be restarted to recover from shutdown, as described below.
In the case of the KiwiSDRs, they are connected with fairly long leads (about 6 feet, 2 meters) and often have enough internal resistance to reduce the current below the power supply's overcurrent limit and rather than allowing the full current of the power supply (which could be more than 20 amps) to flow through and burn up this cable, the fuse will trip as it should, protecting the circuit. To "reset" the fuse, the current must be removed completely for long enough for the device to cool - something that is done with the 5 volt supplies as we'll see, below.
The controller:
As mentioned earlier, if you look on the web, you'll see other power supply projects that use an ATX power supply as a benchtop power source and most of those suggest that one simply connect the green (power on) wire to ground to turn it on - but this isn't the whole story. In testing the power supply, I noticed two conditions in which doing this wouldn't be enough:
- Shorting a power supply output. If the output of a good-quality ATX power supply is shorted, it will immediately shut down - and stay that way until the mains power is removed (for a minute or so) or the power supply is "shut off" by un-grounding the green wire for a few seconds before reconnecting to "restart" the power supply.
- Erratic mains power interruption. It was also observed that if the mains power was removed for just the right amount of time, the power supply would also shut down and would not restart on its own. It took the same efforts as recovering from an output short to restart the power supply.
Since this power supply would be at the WebSDR site - an unmanned location in rural, northern Utah - it would require additional circuitry to make this power supply usable.
Fortunately, an ATX power supply has a second built-in power supply that is independent of the main one - the "standby" power supply. This is a low-power 5 volt supply that is unaffected by what happens to the main supply (e.g. not controlled by the power switch and not affected if it "trips off") and can be used to power a simple microcontroller-based board that can monitor and sequence the start-up of the main power supply. For this task I chose the PIC16F688, a 14 pin microcontroller with A/D conversion capability and a built-in clock oscillator.
As seen in the schematic, the "5 volt standby" is dioded-ORed (D601, D602) with the main power supply (12 volts) so that it always gets power - from either the 5 volt standby, or from the 12 volt output - when mains is applied. R603 and capacitor C602 provide a degree of protection to the voltage regulator should some sort of "glitch" appear on the 12 volt supply - possibly due to the 5 volt load being abruptly disconnected (or connected) as the 5 and 12 volt supplies are "co-regulated" in the sense that it's really only the 5 volt output that is being regulated well - the 12 volt power supply's output is pretty much a fixed ratio to the 5 volt and doesn't really have much in terms of separate regulation.
It should be noted that when operating from the standby +5 volt power source, the voltage from U2 (the 5 volt regulator) is on the order of 3 volts or so (drop through D602 and U2) but this is comfortably above the "brownout" threshold of the PIC, which is around 2.5 volts, so there isn't really a worry that the low-voltage brownout detector will trigger erroneously and prevent start-up. If it had, I would have simply moved the cathode side of D602 to the +5V side of U2.
 |
| Figure 3: Inside the case! Top right: 12 volt supply filtering and thermal fuse Upper-middle: Dual 5 volt filtering Lower middle: Controller board with FET switches and thermal fusing. The ATX power supply is in the lower-left corner. Click on the image for a larger version. |
- When the microcontroller starts up, it makes sure that the ATX "power on" wire is turned off (e.g. un-grounded). This is done by the microcontroller turning off Q401.
- After a 10 second delay, it turns on the power supply by turning on Q401.
It also monitors the power supply to look for a fault. If either the 5 or 12 volt output is shorted or faults out, both power supply outputs (but not the 5 volt "standby" output) disappear.
- If, while running, the monitored 12 volt supply (via R601/R602 and "12V V_MON") drops below about half the voltage (e.g. trips out) the "power on" wire is turned off using Q401, disabling the ATX power supply.
- A 10 second delay is imposed before attempting to turn the power supply back on.
- Once the power supply is turned back on, monitoring of the voltage resumes.
In practice, if there is a "hard" short on the output, the power supply will attempt to restart every 10 seconds or so, but remember that a short on an output could occur with ANY sort of power supply, so this isn't a unique condition.
5 volt output sequencing and monitoring:
The other function of the controller is to sequence and monitor the 5 volt outputs. As mentioned earlier, it was noted that the KiwiSDRs do not "like" a slow voltage ramp-up so a FET switch is employed to effect a rapid turn-on - and since there are two separately-filtered 5 volt busses, there are two such switches. In order to reduce the peak current caused when the load is suddenly connected, each of these busses is turned on separately, a 10 second delay between the two of them.
The N-channel FET switches (Q203, Q303) are controlled by an NPN (Q201, Q301) transistor being turned on by the microcontroller which, in turns, "pulls" the base of a PNP transistor (Q202, Q302) low via a base resistor (R202/R302), turning it on - and other resistors (R203, R303) assure that these transistors are turned off as needed.
With the emitter of the PNP connected to the 12 volt supply, the gate voltage of the FET is approximately 7 volts higher than the drain voltage, assuring that it is turned on with adequately low resistance. Capacitors (C201, C301) are connected between the FET's gates and sources to suppress any ringing that might occur when the power is turned on/off and as a degree of protection against source-gate voltage spikes while the 47k resistor (R207/R307) assure that the FET gets turned off.
The use of P-channel FETs was considered, but unless special "logic level" threshold devices were used, having only 5 volts between the gate and drain wouldn't have turned them fully "on" unless the -5 or -12 volt supply from the power supply was also used. While this would certainly have been practical, N-channel FETs are more commonly available.
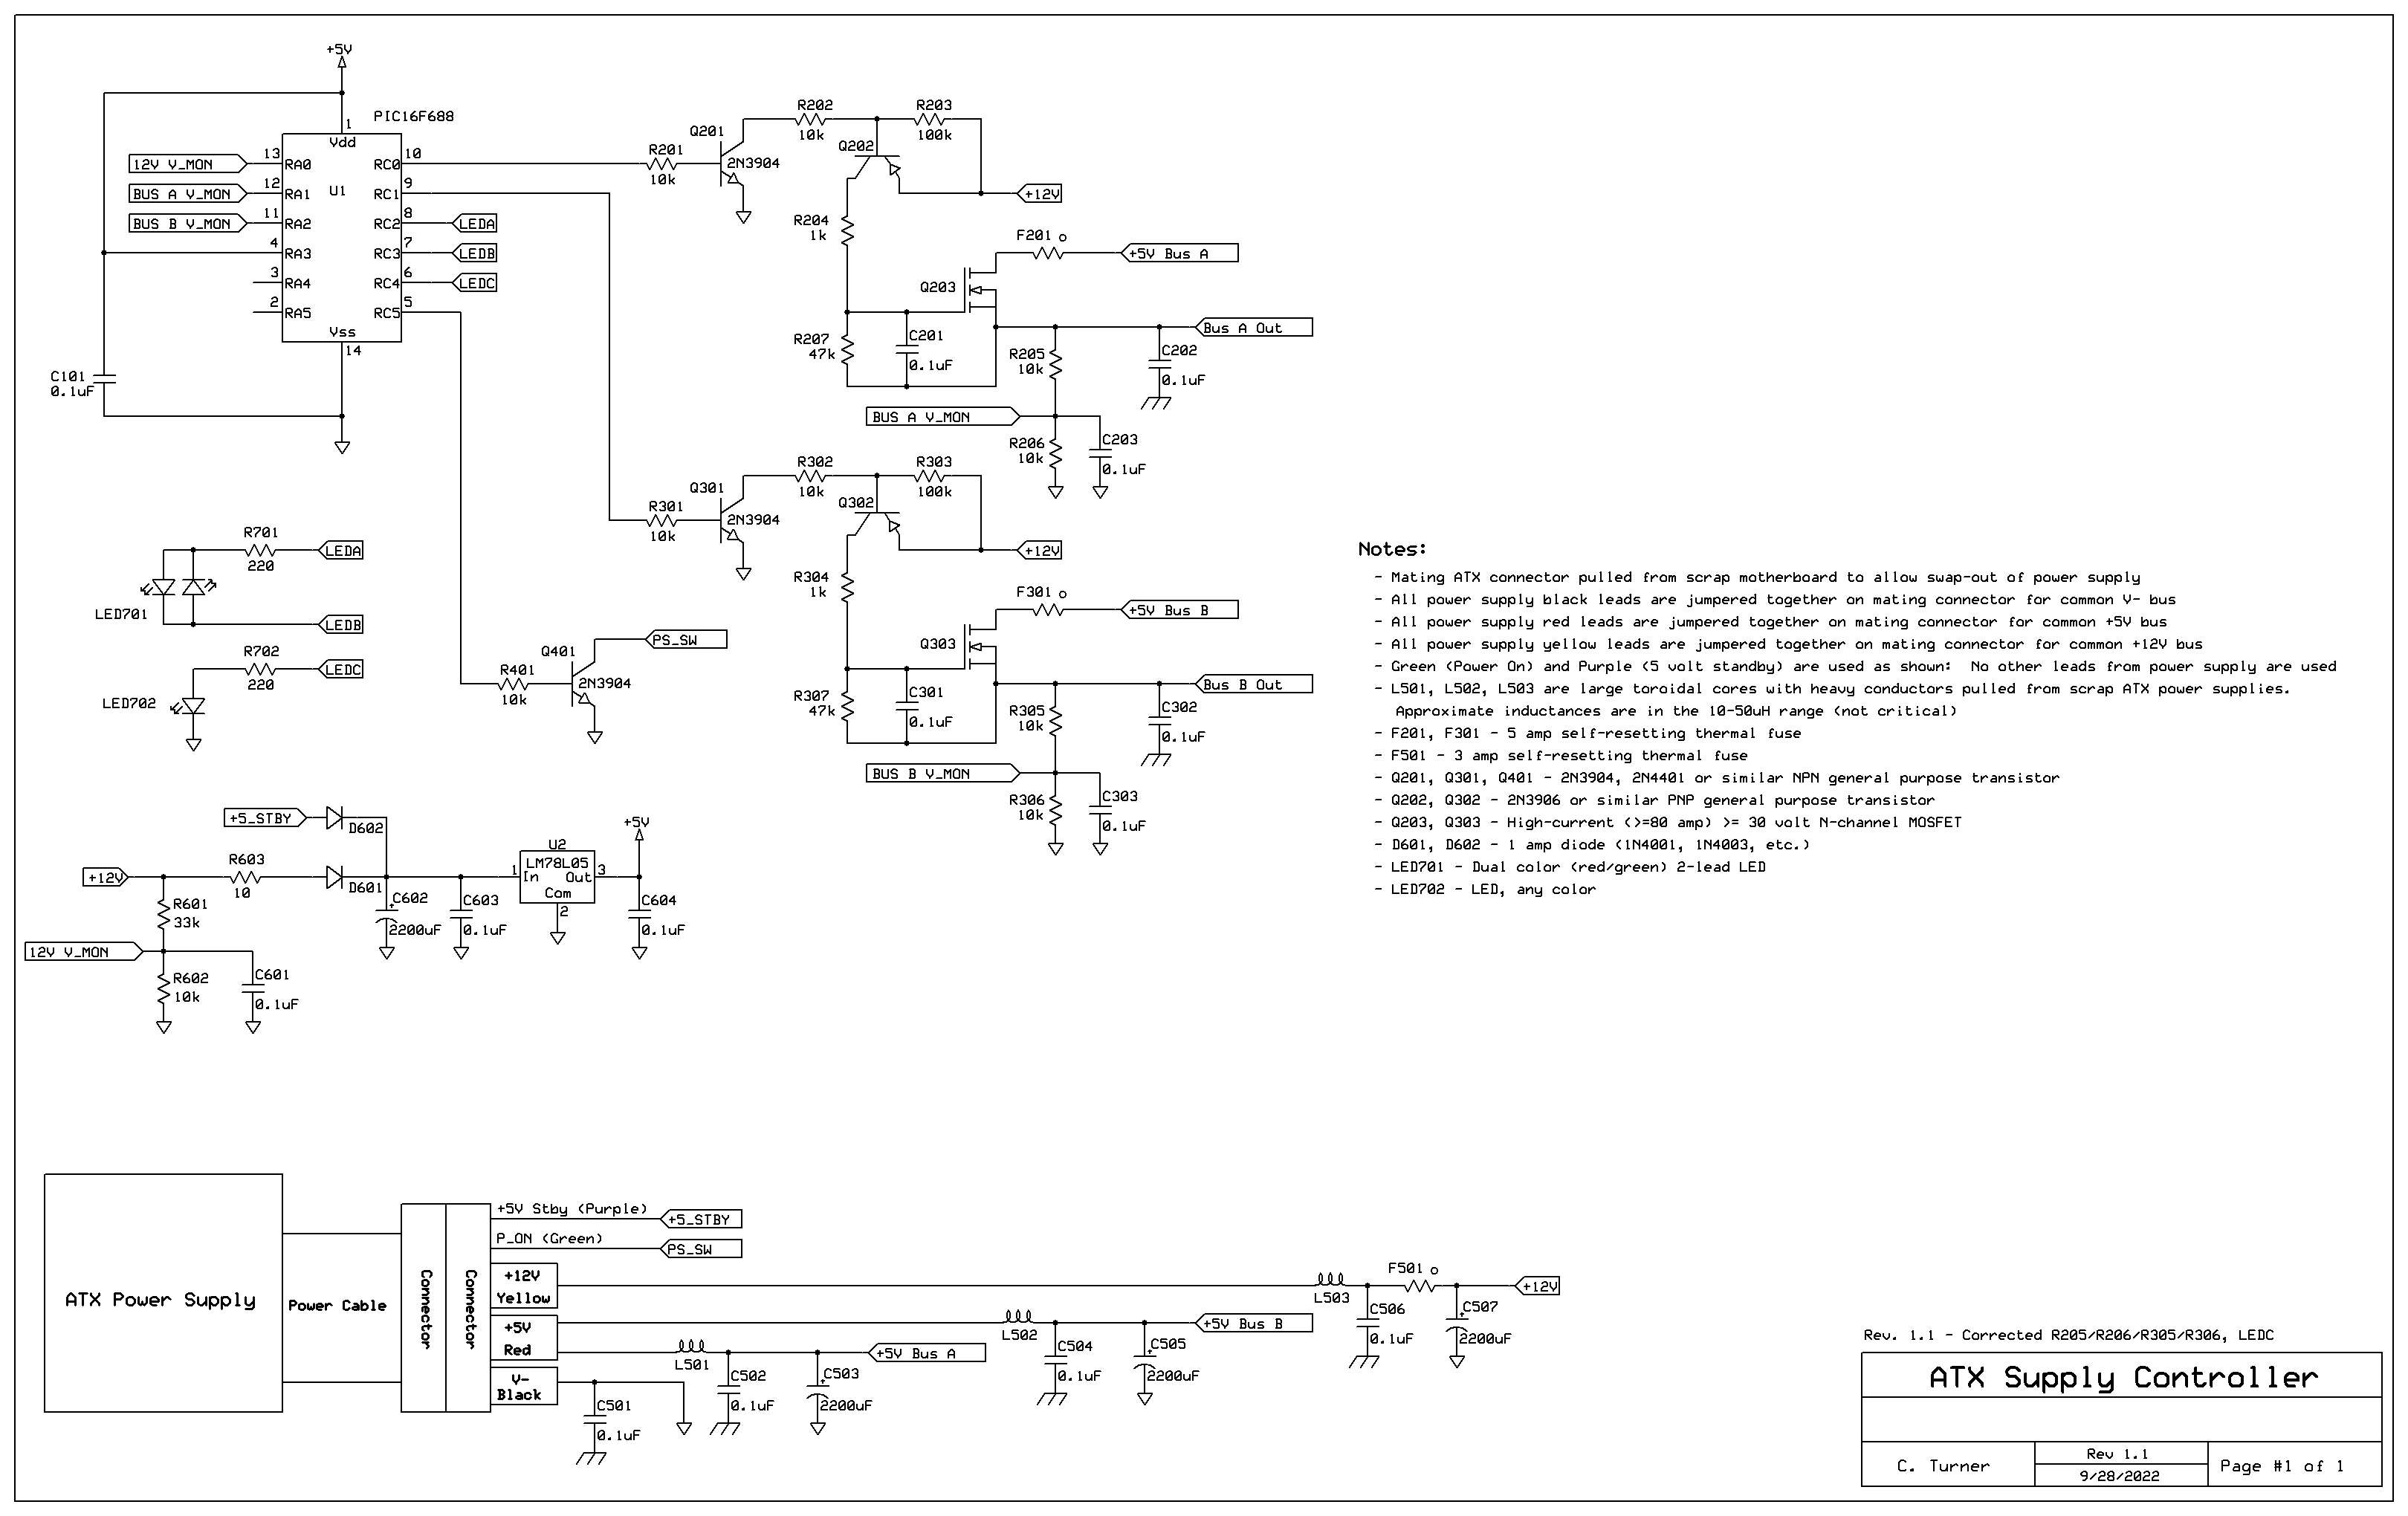 |
| Figure 2: Schematic of the ATX controller with power supply filtering, voltage monitoring, and control. See the text for a description. Click on the image for a larger version. |
In series with the 5 volt supply and the FET's source is a 5 amp self-resetting thermal fuse to limit current. Should an overload (more than 5-ish amps) occur on the output bus, this fuse will heat up and go to high resistance, causing the output voltage to drop. If this occurs, the microcontroller, which is using its A/D converter to look at the voltage divider on the outputs (R205/R206 for the "A" channel, R305/R306 for the "B" channel) will detect this dip in voltage and immediately turn off the associated FET. After a wait of at least 10 seconds - for the fault to be cleared (in the event that it is momentary) and to allow the thermal fuse to cool off and reset - the power will be reconnected. If there continues to be a fault, the reset time is lengthened (up to about 100 seconds) between restart attempts.
Finally, the status of the power supply is indicated by a 2-lead dual-color (red/green) LED (LED701) mounted to be visible from the front panel. During power supply start-up, it flashes red, during the time delay to turn on the power supplies it is yellow, when operation is normal it is green - and if there is a fault, it is red. Optionally, another LED (LED702) can be mounted to be visible: This LED is driven with the algorithm that causes it to "breath" (fade on and off - and on, and off...) to indicate that "something" was working. I simply ran out of time, so I didn't install it.
* * *
This power supply was put together fairly quickly, so I didn't take as many pictures as I usually would - and I omitted taking pictures of the back panel where the power supply connections are made. Perhaps it's just as well as while I used a good-quality screw-type barrier strip, it was mounted to a small piece of 1/4" (6mm) thick plywood that was epoxied into the rectangular hole where one would connect peripherals to the motherboard.
As you would expect, the terminals are color-coded (using "Sharpies" on the wood!) and appropriately labeled. While not pretty, it's functional!
(Comment: The photo in Figure 3 was taken before I added the circuit to control the "Power On" wire (e.g. Q401) and the diode-OR power (D601, D602) - and it shows the dual-color LED on the board during testing.)
If you are interested in the PIC's code, drop me a note.
This page stolen from ka7oei.blogspot.com
[END]
No comments:
Post a Comment
PLEASE NOTE:
Be sure to be logged in to your Google account to post.
While I DO appreciate comments, those comments that are just vehicles to other web sites without substantial content in their own right WILL NOT be posted!
If you include a link in your comment that simply points to advertisements or a commercial web page, it WILL be rejected as SPAM!