Showing posts with label gps. Show all posts

Monday, November 25, 2024

The "Universal TCXO" - better stability for the Kenwood TS-590, TS-570 (and other radios) using the QRP Labs ProgRock 2

Figure 1:
The TS-590G into which the ProgRock was installed.
A useful accessory for many amateur transceivers is a TCXO - a device, often offered as an option, that improves the absolute frequency stability and accuracy of the radio.  When in current production, the TCXO is available from the manufacturer - and possibly from third parties - but long after the radio has been made, a TCXO may be difficult to find.

One option for addressing this issue is the use of the QRP Labs ProgRock 2 - LINK.  This unit is relatively inexpensive (US$18 at the time of writing) and has a stability of 0.25ppm - which is likely better than the original TCXO offered by the manufacturer - and likely less expensive as well.

This page describes not only the installation of the ProgRock 2 in a Kenwood TS-590, but also in the TS-570:  These two radios use very different frequencies, but the ProgRock 2 is easily programmed to whatever is needed!

Any weird frequency

While it would be convenient if radios had a nice, easy frequency like 10 MHz as their main oscillator, that is rarely the case - and this was true for a friend's TS-590G which wanted 15.6 MHz.  This radio, which he purchased second-hand, did not come with a TCXO and based on his experience during June Field Day and winter Field Day (in January) it drifted excessively - more than a few 10s of Hz on 10 meters - enough that he would occasionally get complaints about him being "off frequency" - even if it was he that was calling CQ!

Although an aftermarket unit was available, he was intrigued by the idea of using the ProgRock 2 as this same device could be programmed for any frequency between about 3.5 kHz and somewhere near 300 MHz with a resolution of 1 Hz.  Additionally, the ProgRock 2 allows the use of a 1 PPS (1 pulse-per-second) output from a GPS module to "discipline" the oscillator with even greater stability - but more on this later.

Prepping the ProgRock 2

Using the ProgRock 2 is pretty easy:  It has a micro-USB connector onboard and when plugged into a computer, it can appear as a serial port - refer to the manual for the appropriate driver.  Using a serial terminal program - like PUTTY - one simply enters the frequency, to the nearest 1 Hz, hit the "S" key to save it to memory and you are pretty much done.  The ProgRock will allow the output of more than one frequency if needed (the manual has more detail) but we will be using output #1, which is also the one into which we'd program the needed frequency, setting the others to zero (e.g. "off").

Figure 2:
ProgRock 2 with the 3.9 and 10k resistors mounted to allow
the external application of a 1pps signal from a GPS module
to stabilize the frequency further.  The bottom side of the
ProgRock 2 is shown.
Click on the image for a larger version.

Having said that, there's a bit more to it in that it needs power, ground, and the signal output needs to get into the radio - but more on that in a moment.  

As my friend wished to experiment with using a 1 PPS source to nail it down to frequency, a 3.9k series resistor was added to the "1pps" pin along with a 10k resistor to ground to keep the pin from "floating" around in voltage when nothing was connected to it.  Figure 2 shows these resistors mounted on the "bottom" side of the board:  The upper resistor is the 3.9k connected to the 1pps pad with the lower, 10k resistor connected to a ground pad.  The junction of the two (with the yellow piece of insulating tubing) is where the 1pps input would be connected.

The use of the 3.9k resistor is described in the ProgRock 2's documentation which notes that the onboard microcontroller operates from 3.3 volts - but placing this resistor in series (the value of which isn't particularly critical) limits the current into the logic pin, allowing it to be safely driven by a 5 volt - or even 12 volt - 1pps pulse. 

Figure 3:
The Progrock 2 mounted to the original TS-590 TCXO board
using short, insulated jumper wires.  The top side of the
ProgRock 2 is shown.
Click on the image for a larger version.
As noted in the ProgRock 2's documentation, as long as the 1pps pin is held low, it's ignored and the unit will operate based on the frequency set by its onboard oscillator, but when it sees the 1pps pulses, it measures the time between their rising edges to determine how far off the internal clock is from ideal, making slow, incremental changes.  If the 1pps signal were to later disappear, it would simply "hold" that frequency until the ProgRock 2 was power-cycled at which point it would revert to the internal clock unless/until it was again presented with a 1pps signal.

There's a place for it!

While the "stock" TS-590 did not come with a TCXO, there was a small "daughter" board adjacent to the portion of the circuit board with the stock oscillator on which the user is expected to solder a TCXO in the form of a "crystal can" oscillator module - or, in the case of some after-market units - replace that board entirely.  As the ProgRock 2 is roughly the size of a postage stamp (it will fit within an HC-6 crystal can!) it could be wedged on this same board - which is convenient as this board also carries 5 volt power for the original TCXO, so a bit of pretty easy "micro" surgery was undertaken.

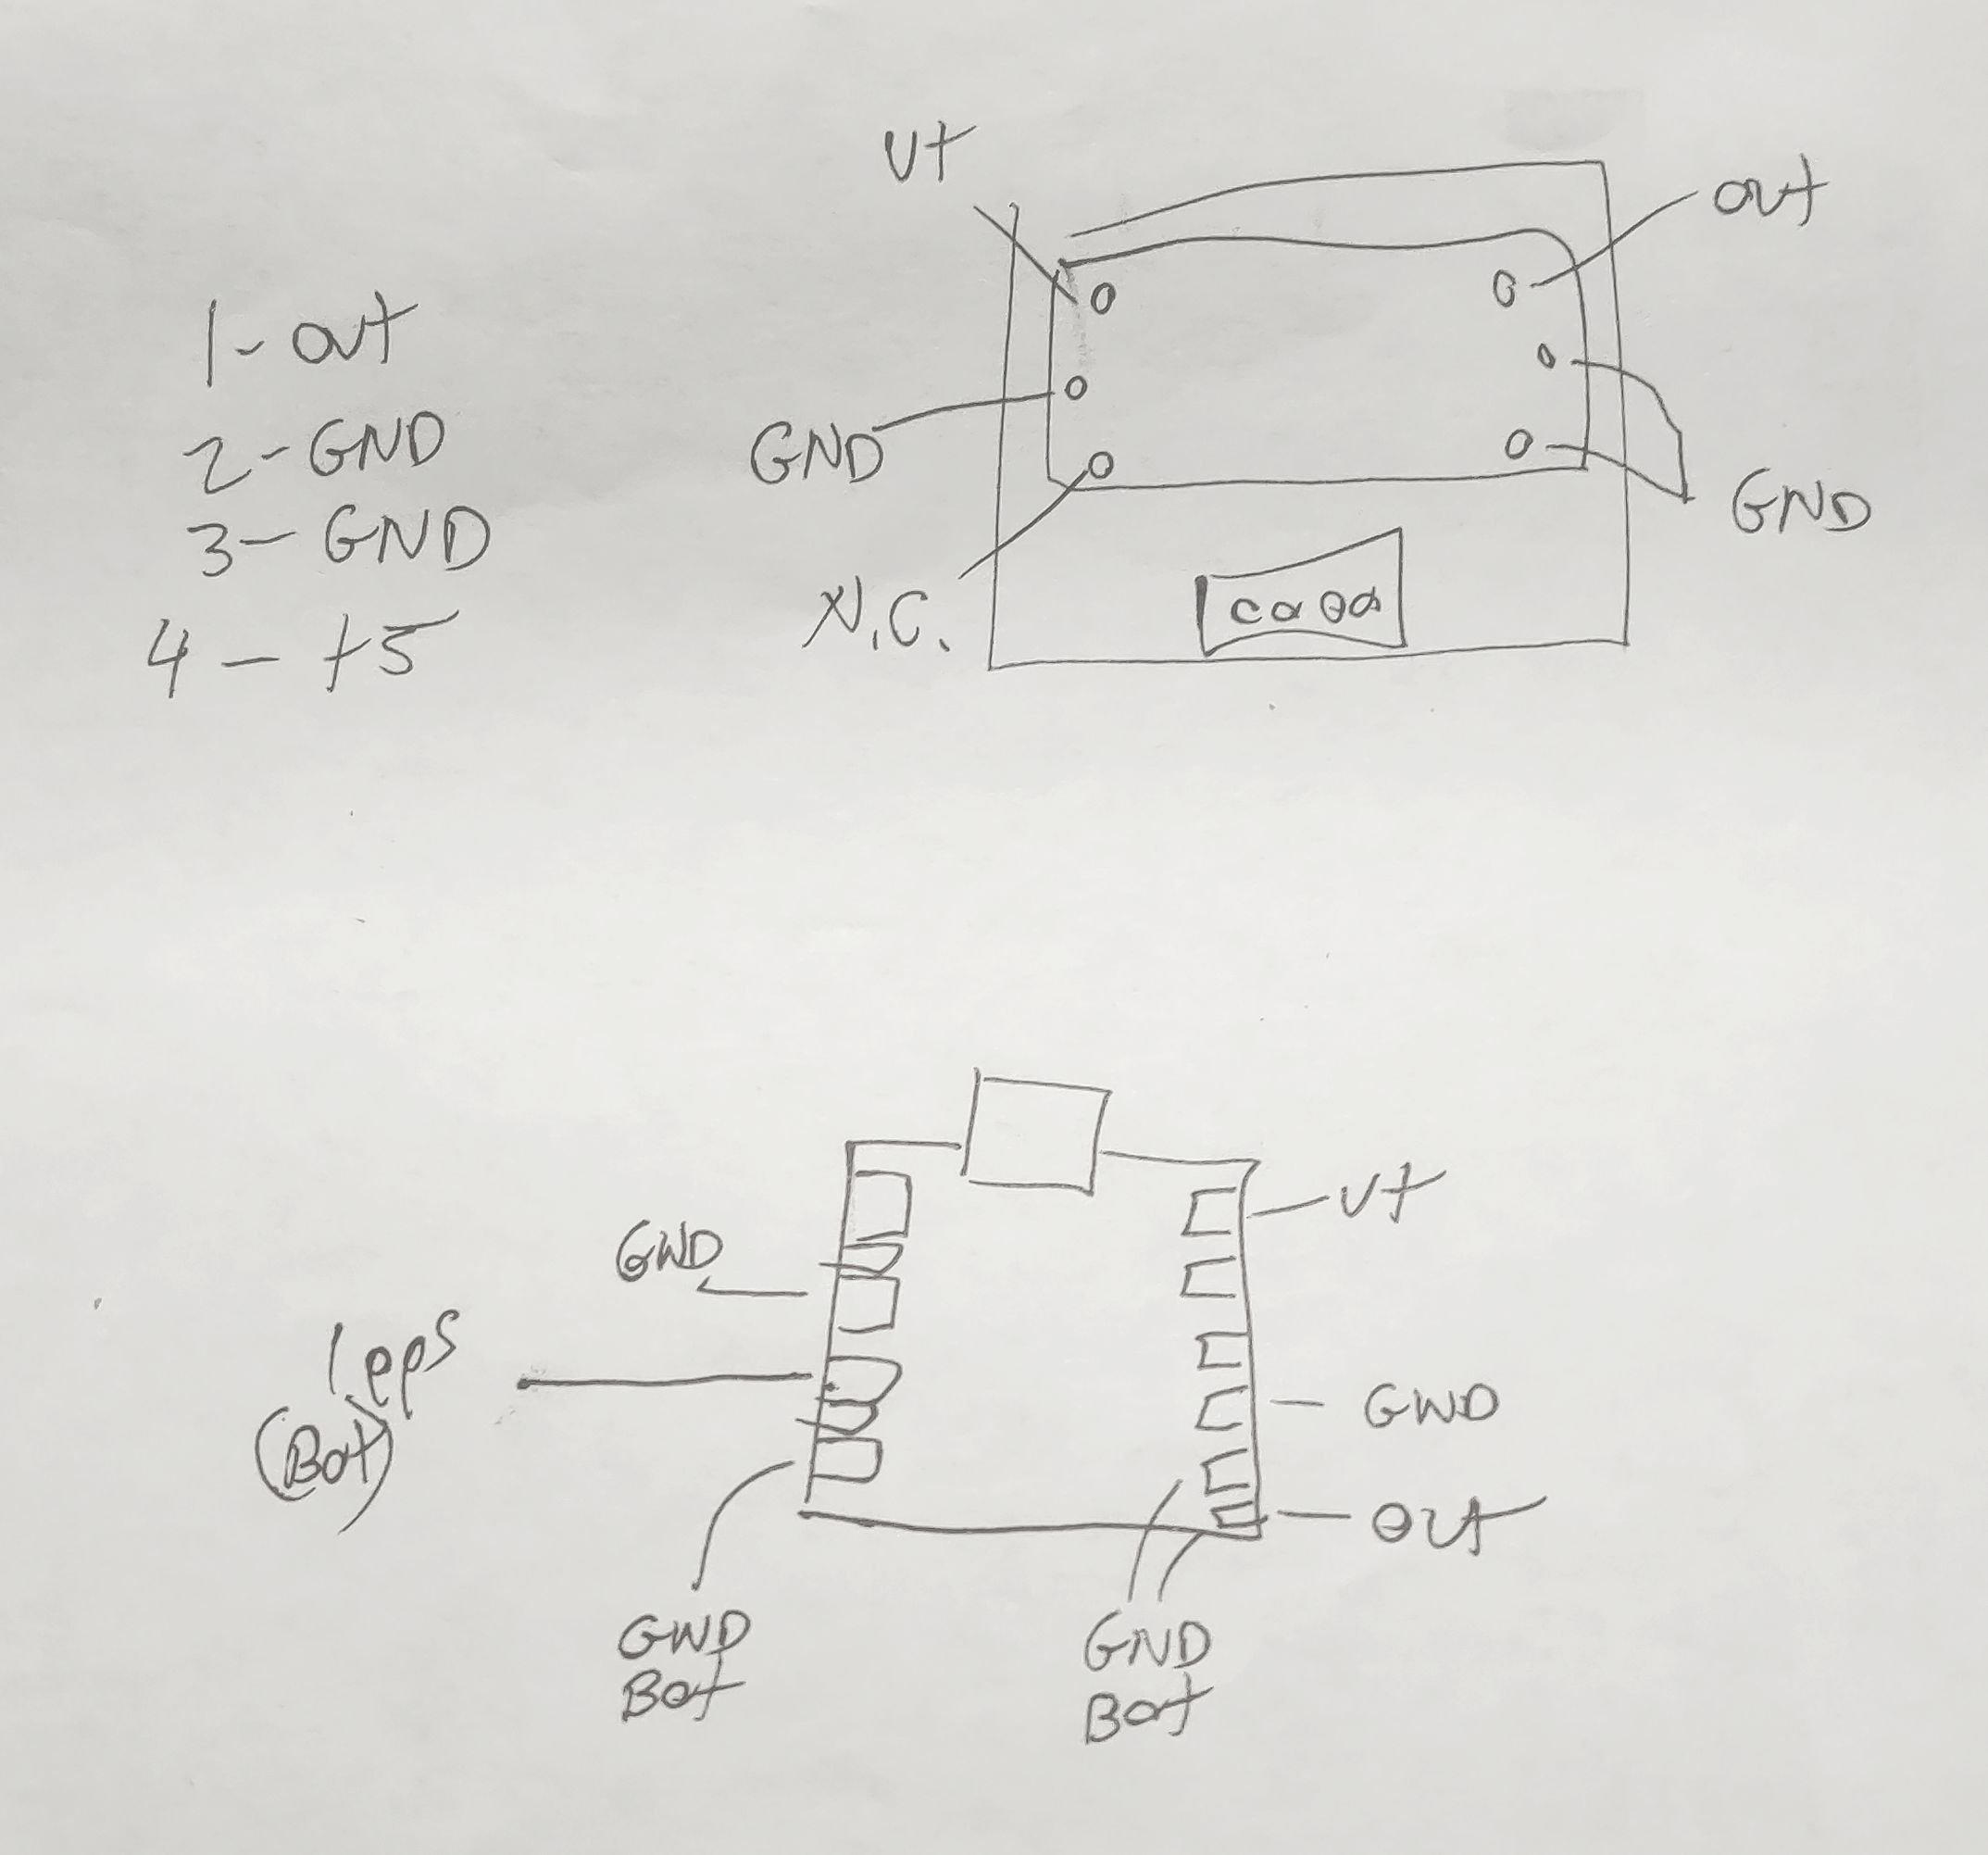
Figure 4:
A hand-drawn diagram showing the connections
on the top side of the TS-590's TCXO board and
the ProgRock 2 board.
Click on the image for a larger version.

Figure 3 shows how the ProgRock 2 board was mounted on the original TCXO board.  Fortunately, all of the needed connections are there:  +5 volts to run the original TCXO, ground, and the signal output.  Figure 4 shows a hand-drawn diagram showing the original TCXO board (top) with its pin locations while a representation of the ProgRock board (with the USB connector oriented on top) is in the lower drawing along with its connections.

Using small gauge, insulated wire liberated from a scrap of CAT5 Ethernet cable, short-as-possible jumpers were run between the TCXO board and the ProgRock.  In Figure 3, the "ground" connections were made using green wire - one of them utilizing the body of the USB connector - while the output signal used blue and the power used orange:  In the upper-right corner of the ProgRock 2 board - just above the USB connector - you can just see the yellow insulating tubing of the 1pps connection.

There is JUST enough room - if one scrunches the edge of the ProgRock 2 board against the TCXO board's white connector (and by routing wires such that they are not between the ProgRock 2 board and the connector) so that it will fit in the original location within the TS-590 as can be seen in Figure 5, below.

Comment:

It was noted - during testing of the TS-590 - that  the combination of 10 meters at 100 watts while using the built-in tuner - seemed to "glitch" the ProgRock for reasons unknown, although it's suspected that magnetic fields from the PA/Tuner board are finding their way through the aluminum chassis from the opposite side.  Simply tipping the ProgRock 2 board from being flat against the original TCXO board to more of an angle and adding another ground wire jumper to the TCXO board seemed to fix this.

One important consideration is that you MUST be sure that there's a blocking capacitor somewhere between the output of the ProgRock 2 and the input of the circuit that it's driving.  As it turns out, the stock TS-590 TCXO board has such a blocking capacitor - but if your application does not, or you are not sure if it does, simply use a 0.001 to 0.1uF capacitor in series with the output - and this capacitor may also serve in lieu of a jumper wire in connecting it to the radio.

Finally, don't forget to disable the original oscillator of the radio into which you are installing the ProgRock 2.  In the case of the TS-590, there are two jumpers that must be removed - one to cut power to the original oscillator and the other to disconnect its output - these black jumpers are just visible to the right of the orange connector on the jumper cable to the TCXO board on Figure 5.  In some radios the TXCO replaces the original oscillator entirely so there's no need to "disable" it.

Figure 5:
The TCXO + Progrock 2 boards, installed in the TS-590.
There is enough wire length to connect the USB to program
the ProgRock in-situ if the mounting screw is removed.
Click on the image for a larger version.

Checking the calibration

You might notice that the TS-590's TCXO board is connected with a short, 4-wire jumper (the red, black and green wires in Figure 5) and this is long enough to allow connection of the ProgRock 2 board to a USB cable and a computer to allow the frequency to be adjusted "live", while the radio is in operation - this requires removing the single mounting screw to permit the board to "hang loose".

Simply setting the ProgRock 2 to 15.6 MHz exactly in the configuration menu resulted in the TS-590 being within 2 Hz of the correct frequency when checked against the 10 MHz WWV/H signal - this difference likely because the ProgRock 2's onboard 25 MHz oscillator was very slightly off, but well within the 0.25ppm tolerance.

But what if you wanted it to be closer?  Keep in mind that the frequency tolerance of the ProgRock 2's own TCXO is 0.25ppm which amounts to as much as 2.5 Hz at 10 MHz (or 7.5 Hz at 30 MHz) so absolute accuracy over a wide temperature range is unrealistic - but "dialing it in" at the typical room temperature (or that of the radio's interior after it has been on for a while) is quite reasonable - although there's a caveat to this if you plan to use the 1pps input as we'll soon discuss.

Dialing it in

If you have an ultra-precise frequency reference such as a GPS-disciplined oscillator or a Rubidium reference, by all means use it - but if you don't, you can use an off-air frequency reference like WWV, WWVH, CHU, BPM, or whatever else is near you that is KNOWN to be very precise - but the higher the frequency, the better.

Using 15 MHz WWV as an example, tune the radio USING THE KEYPAD so that it is exactly on frequency:  Note that the TS-590 can tune smaller than the 10 Hz steps shown on the display, so turning the dial doesn't guarantee that you are on the "zero Hz" frequency step.  Without bumping the main tuning knob and knocking it off by less than a 10 Hz step listen for the WWV transmission to hear the portion when they are transmitting the 500 or 600 Hz tone (this step won't work if they are not transmitting this tone) and switch between USB and LSB:  If you hear any difference in tone, you may wish to tweak the ProgRock's frequency up or down as appropriate.  If the tone on USB is slightly lower than that on LSB, the ProgRock's frequency needs to be set slightly lower.

An alternative method to setting the frequency is to use a spectrum analysis program - "Spectran" by I2PHD (LINK) is probably the easiest to use.  In this case, one would tune Spectran for a 1 kHz tone and configure it to pick up the audio via the computer's microphone or a web cam - or using a direct audio connection such as a rig interface or audio cable from the radio.  If you are using WWV/H for this, it's suggested that you first listen using AM and verify that your sound card's sample rate is accurate, with Spectran showing precisely 500 or 600 Hz during the periods when WWV/H is transmitting those tones.  If you find that it's not showing exactly 500 or 600 Hz (to within a Hz or so) you may wish to try a different sound card/computer combination or just do a bit of math to compensate for the slight difference in the audio card's sample rate.

Using USB on the TS-590, tune exactly 1 kHz below WWV/H (e.g. 14.999 kHz) using the keypad and measure the frequency of the carrier:  If the tone frequency measures slightly high when using USB, the ProgRock's 15.6 MHz frequency can be increased slightly - but remember that it may be done only in 1 Hz steps.  Remember that 1 Hz at 15.6 MHz will cause a frequency shift of about 0.6 Hz at 10 MHz and almost 2 Hz at 30 MHz as the effect will be proportional to the radio of the reference frequency (15.6 MHz in this case) and the frequency to which the receiver is tuned.

Note:  If you have a known-accurate reference oscillator of your own (such as a GPS Disciplined oscillator, Rubidium oscillator or similar) by all means, use it!

Comment about tuning step size.

Many modern transceivers tune in 10 Hz steps or finer - but note that these steps are often not exactly what they may seem.  For example, some radios' 10 Hz steps aren't exactly 10 Hz each - some being a bit more, some being a bit less - but that they will average 10 Hz steps.  The same goes for the smaller step sizes as well.

Keep this in mind when you are attempting to set/measure a given radio exactly to frequency as this slight difference in step size may result in some frequencies being slightly different from what is expected and this difference may vary by seemingly random amounts.

Using the (optional) 1pps input on the ProgRock 2

As noted earlier, the ProgRock 2 can take a 1pps input from a GPS receiver module, using this to make gradual corrections of the frequency.  Doing this if the GPS signal is reliable will result in the frequency being very stable over a wide temperature range, but there are two caveats to this:

  • The ProgRock 2 doesn't (yet?) have in its firmware a means by which one can input an offset of its 25 MHz TCXO frequency.  As the onboard 25 MHz TCXO is not likely to be exactly correct, this means that if you set set the frequency at room temperature - and the oscillator is slightly off - when you apply a 1pps input the frequency will then be shifted assuming a 25 MHz clock frequency.  The reason for this is that the 1pps will set the frequency as if the onboard 25 MHz TCXO were 25 MHz, exactly - but since it probably isn't (remember - it's rated to be within 0.25ppm) a frequency shift will result.
    • In other words, if you want your radio to be precisely on frequency with a 1pps input, you will have to "dial it in" with 1pps applied and expect it to be slightly off when no 1pps signal is present.
    • If you ever do apply a 1pps signal - even briefly - the Progrock 2 will "remember" that offset even when the 1pps is removed until the unit is power-cycled.  If the 1pps is removed, the oscillator will now be free to drift with temperature. 
  • The frequency step corrections as a result of the 1pps input are not infinitesimally small.  What this means is that with 1pps applied, every second the frequency will shift slightly, typically hovering above and below the target - but the magnitude of these corrections may be set in the configuration of the ProgRock 2.
    • For most modes on HF - including FT8, FT4, PSK31, CW, Sideband or even many digital modes - these small "sub-Hz" shifts would likely be inconsequential. 
    • If you are using a digital mode where fractional-Hertz frequency shifts are important, you may want to carefully consider using 1pps at all, weighing the pros and cons of having seemingly random small frequency shifts.  Modes where this may be important would be WSPR, FST4W (particularly the modes longer than 2 minutes), coherent CW, during an FMT (Frequency Measurement Test) or any other instance where small frequency steps may be disruptive.
    • If you are in a situation where the continual frequency correction is an issue but you want the frequency to be closer than what the TCXO onboard the ProgRock will allow you might consider manually applying the 1pps signal intermittently to occasionally recalibrate the frequency.  This would allow the frequency to drift slightly with temperature between calibration intervals.
    • While one may configure the adjustment size in the ProgRock 2 and likely minimize the size of the frequency adjustment steps, remember that it must be capable of correcting for the normal and expected frequency changes related to temperature.  This need sets a minimum correction size that will be practical and the varying environments with differing temperature and its stability will affect this.
    • If you are using a 1pps input on a radio that operates in the VHF/UHF and/or microwave frequencies, these small frequency shifts will be proportionally larger and may even be noticeable on SSB and/or as slight "clicks"in received audio - possibly making the radio unusable for digital modes altogether.  It may be possible to configure the ProgRock 2 to mitigate this somewhat by reducing the magnitude of the corrections, but they will always be there.

* * *

A ProgRock 2 in the Kenwood TS-570

The (older) Kenwood TS-570 (all variants) can also be retrofitted with a ProgRock 2 in lieu of the Kenwood "SO-2" TCXO - and it's also pretty easy.  Using the same steps as above, program the ProgRock 2's "Clock 0" for 20000000 Hz (20 MHz exactly).  I modified my own TS-570 for the same reason that my friend modified his TS-590:  The original oscillator would audibly drift in frequency with temperature and it was over 100 Hz high on 10 meters  (approx. 25 Hz on 40 meters) once it warmed up, causing the occasional complaint that I was off-frequency.  I do not use this radio for digital modes like FT-8, but if I had, I'm sure that I would have made this modification some time ago!

Figure 6:
The ProgRock 2 installed in place of the original Kenwood
SO-2 TCXO in the TS-570.  The wires through the
board were bent and soldered to the V+ and three
ground pins.  The output of the ProgRock 2 is
connected to the "out" pin on the board via a 47 ohm
and 1000pF capacitor in series.
Click on the image for a larger version.
Via online search, you can find the instructions for installing the SO-2 TCXO module and these show how the PLL board (the one in the bottom of the radio) may be removed:  Be careful with the flat ribbon cables!

Rather than solder in the TCXO, cut five short pieces of tinned wire (20-24AWG, 0.6-0.8mm dia) to be about 3/4" (20mm) long and solder them in the five holes into which the original TCXO was soldered and re-install the board.

On the board itself you'll notice that two of the holes are marked - one for power and one for the "out" pin of the TCXO into which we will feed our 20 MHz clock from the ProgRock 2:  The other three pins are ground.  First, the ProgRock 2 is "dry fit":  It is placed on the circuit board (with a piece of foam or cardboard underneath to space it slightly away - perhaps 1/8" to 3/16" or 3-5mm) and the wires that we soldered bent around to the contact pads and trimmed, taking care that they not touch the pads on the back side of the board or anywhere else that they shouldn't.

As can be seen in Figure 6, the "V+" pin was wrapped around and soldered to the "V+ pin (which carries 5 volts) on the ProgRock 2 (the one in the lower-right corner of the ProgRock board in Figure 6) while two of the the three wires for the ground connect to top-side "GND" pads on the ProgRock while the third is soldered to the top of the USB connector.  As the ProgRock 2 is very light, these wires are more than adequate to hold it into place - just be sure to keep the board height low enough to avoid interfering with the shield when it is replaced.

The top-right corner pad on the ProgRock 2 in Figure 6 is the "CLK 0" that we programmed - but like the TS-590, it must be capacitively coupled to the clock input on the TS-570 and this is done with a series capacitor:  I used a 1000pF capacitor for this, but anything between 470pF and 0.01uF would be fine.  On the schematic I noted that there is a 10pF capacitor to ground in the TS-570 on the "out" pin so I also included a 47 ohm resistor in series with the capacitor just in case the output of the synthesizer would be "unhappy" with capacitive loading - and also to reduce the amount of RF drive into the '570's clock input.  This resistor may not have been necessary, but hey, it's just a resistor so why not play it safe?  The final steps are to cut the two resistors, R503 and R504, seen to the right of the ProgRock 2 board:  This necessary step disconnects the power and the output of the original oscillator circuit.

Upon reassembling the TS-570, I tuned in WWV on 5 MHz and switched between LSB and USB (with the RIT set to zero) and heard no discernible change in pitch during a part of the transmission with the tone indicating that the radio was "dead on" frequency.  As the ProgRock 2 is rated for 0.25ppm stability, it should stay within 5-8 Hz on 10 meters, worst-case - about 1/20th as much drift as with the original oscillator!

While I could have done so, I chose not to add the resistors to permit the external application of a GPS-based "1pps" input to "lock" the ProgRock 2, as was described above for the TS-590.

From start to finish, it took me about an hour to program and install the ProgRock 2 in my TS-570 - but your mileage may vary.

* * *

Using the ProgRock2 in other radios

As the ProgRock2 can be programmed for about any frequency you like, it can be used in radios other than the Kenwood TS-590 or TX-570.   The ProgRock 2 draws a modest amount of current (40-60mA) so its addition will likely not be consequential in power consumption on "desktop" and "mobile" radios - but it may be significant on a QRP or portable radio.  It's likely that most radios do NOT have a handy board onto which the ProgRock 2 may be easily mounted like the TS-590, but the unit is small enough that it will likely fit in/near the location intended for the oscillator/TCXO.

Be sure to use as short as leads as practical and it will likely be necessary to use some sort of adhesive (foam pad or glue) or some sort of "zip tie" to hold the ProgRock 2 board into place.  If possible, be sure to install it such that the ProgRock 2 may be moved so that its USB port may be connected to a  computer to allow final tweaking of frequency once it is installed - at least before it is secured into place:  Once the frequency has been "dialed in" it's unlikely that you'll need to readjust it any time soon.

The ProgRock 2 is also rather flexible in its power supply, but even though it is rated to 12.0 volts, I would NOT recommend allowing more than 10 volts ever be applied to it - and the input voltage can be as low as around 4 volts meaning that it's likely that if the radio itself has an already-existing supply rail (5 volts like the TS-590 - many radios have an 8, 9 or 10 volt supply as well) that will work nicely or one could use an appropriately-chosen series resistor (likely in the 47-82 ohm range for a 12 volt supply - but please do your own measurements) to drop its supply by a few volts.

As noted above, you must be sure to keep the DC on the output terminal of the ProgRock from being shorted to ground (via a transformer or inductor to ground) or to another voltage source (such as a bias network of an amplifier/buffer) as it has no blocking capacitor of its own.  In the TS-590 the original TCXO board had its own blocking capacitor - but if your intended circuit doesn't have such - or if you don't know if it has one - simply add a 0.001 to 0.1uf (value not critical) series blocking capacitor of your own.

Most "recent" radios (e.g. those made since the early-mid 90s) have a single frequency reference for their synthesizer - but ones prior to this (and a few after) may have more than one master oscillator that determines the precise frequency.  It's worth noting that the ProgRock 2 can output more than one frequency at a time (three if you are not using the 1pps input - just two if you are) and it may be possible to program one of the ProgRock's other outputs to another useful frequency.  One possibility is for very old analog radios that sport a 100 kHz crystal calibrator or similar:  The ProgRock 2 would be excellent for this purpose.

In some cases, these "other" frequencies may include the radio's BFO (Beat Frequency Oscillator) or HFO (Heterodyne Frequency Oscillator) in which case you may need to be more creative - but it's worth noting that the ProgRock has up three "digital" inputs that may optionally be used allowing up to eight separate frequency combinations to be produced - possibly allowing one to replace impossible-to-find crystals in vintage radios - but this is a possible topic of another article.

* * * * *

This post stolen from ka7oei.blogspot.com

[END]


Friday, October 20, 2023

Multi-band transmitter and monitoring system for Eclipse monitoring (Part 1)

It should not have escaped your attention - at least if you live in North America - there there have been/will be two significant solar eclipses occurring in recent/near times:  One that occurred on October 14, 2023 and another eclipse that will happen during April, 2024.  The path of "totality" of the October eclipse happened to pass through Utah (where I live) so it is no surprise that I went out of my way to see it - just as I did back in 2012:  You can read my blog entry about that here.

 Figure 1:
The eclipse in progress - a few minutes
before "annularity".
(Photo by C. L. Turner)
I will shortly produce a blog entry related to my activities around the October 14, 2023 eclipse as well.

The October eclipse was of the "annular" type meaning that the moon is near-ish apogee meaning that the subtended angle of its disk is insufficient to completely block the sun owing to the moon's greater-than-average distance from Earth:  Unlike a solar eclipse, there is no time during the eclipse where it is safe to look at the sun/moon directly, without eye protection.

The sun will be mostly blocked, however, meaning that those in the path of "totality" experienced a rather eerie local twilight with shadows casting images of the solar disk:  Around the periphery of the moon it was be possible to make out the outline of lunar mountains - and those unfortunate to stare at the sun during this time will receive a ring-shaped burn to their retina.

From the aspect of a radio amateur, however, the effects of a total and annular solar eclipse are largely identical:  The diminution of the "D" layer and partial recombination of the "F" layers of the ionosphere causing what are essentially nighttime propagation conditions during the daytime - geographically limited to those areas under the lunar shadow.

In an effort to help study these sort of effects - and to (hopefully) better-understand the propagation effects, a number of amateurs went (and are) going out into the field - in or near the path of "totality" - and setting up simultaneous, multi-band transmitters.

Producing usable data

Having "Eclipse QSO Parties" where amateur radio operators make contacts during the eclipse likely goes back nearly a century - the rarity of a solar eclipse making the event even more enigmatic.  In more recent years amateurs have been involved in "citizen science" where they make observations by monitoring signals - or facilitate the making of observations by transmitting them - and this happened during the October eclipse and should also happen during the April event as well.

While doing this sort of thing is just plain "fun", a subset of this group is of the metrological sort (that's "metrology", no "meteorology"!) and endeavor to impart on their transmissions - and observations of received signals - additional constraints that are intended to make this data useful in a scientific sense - specifically:

  • Stable transmit frequencies.  During the event, the perturbations of the ionosphere will impart on propagated signals Doppler shift and spread:  Being able to measure this with accuracy and precision (which are NOT the same thing!) adds another layer of extractable information to the observations.
  • Stable receivers.  As with the transmitters, having a stable receiver is imperative to allow accurate measurement of the Doppler shift and spread.  Additionally, being able to monitor the amplitude of a received signal can provide clues as to the nature of the changing conditions.
  • Monitoring/transmitting at multiple frequencies.  As the ionospheric conditions change, its effects at different frequencies also changes.  In general, the loss of ionization (caused by darkness) reduces propagation at higher frequencies (e.g. >10 MHz) and with lessened "D" layer absorption lower frequencies (<10 MHz) the propagation at those frequencies is enhanced.  With the different effects at different frequencies, being able to simultaneously monitor multiple signals across the HF spectrum can provide additional insight as to the effects.

To this end, the transmission and monitoring of signals by this informal group have established the following:

  • GPS-referenced transmitters.  The transmitters will be "locked" to GPS-referenced oscillators or atomic standards to keep the transmitted frequencies both stable, accurate - and known to within milliHertz.
  • GPS referenced receivers.  As with the transmitters, the receivers will also be GPS-referenced or atomic-referenced to provide milliHertz accuracy and stability.

With this level of accuracy and precision the frequency uncertainties related to the receiver and transmitter can be removed from the Doppler data.  For generation of stable frequencies, a "GPS Disciplined Oscillator" is often used - but very good Rubidium-based references are also available, although unlike a GPS-based reference, the time-of-day cannot be obtained from them.

Why this is important:

Not to demean previous efforts in monitoring propagation - including that which occurs during an eclipse - but unless appropriate measures are taken, their contribution to "real" scientific analysis can be unwittingly diminished.  Here are a few points to consider:

  • Receiver frequency stability.  One aspect of propagation on HF is that the signal paths between the receiver and transmitter change as the ionosphere itself changes.  These changes can be on the order of Hertz in some cases, but these changes are often measured in 10s of milliHertz.  Very few receivers have that sort of stability and the drift of such a receiver can make detection of these Doppler shifts impossible.
  • Signal amplitude measurement.  HF signals change in amplitude constantly - and this can tell us something about the path.  Pretty much all modern receivers have some form of AGC (Automatic Gain Control) whose job it is to make sure that the speaker output is constant.  If you are trying to infer signal strength, however, making a recording with AGC active renders meaningful measurements of signal strength pretty much impossible.  Not often considered is the fact that such changes in propagation also affect the background noise - which is also important to be able to measure - and this, too, is impossible with AGC active.
  • Time-stamping recordings.  Knowing when a recording starts and stops with precision allows correlation with other's efforts.  Fortunately this is likely the easiest aspect to manage as a computer with an accurate clock can automatically do so (provided that one takes care to preserve the time stamps of the file, or has file names that contain such information) - and it is particularly easy if one happens to be recording a time station like WWV, WWVH, WWVB or CHU.

In other words, the act of "holding a microphone up to a speaker" or simply recording the output of a receiver to a .wav file with little/no additional context makes for a curious keepsake, but it makes the challenge of gleaning useful data from it more difficult.

One of our challenges as "citizen scientists" is to make the data as useful as possible to us and others - and this task has been made far easier with inexpensive and very good hardware than it ever has been - provided we take care to do so.  What follows in this article - and subsequent parts - are my reflections on some possible ways to do this:  These are certainly not the only ways - or even the best ways - and even those considerations will change over time as more/different resources and gear become available to the average citizen scientist. 

* * *

How this is done - Receiver:

The frequency stability and accuracy of MOST amateur transceivers is nowhere near good enough to provide usable observations of Doppler shift on such signals - even if the transceiver is equipped with a TCXO or other high-stability oscillator:  Of the few radios that can do this "out of the box" are some of the Flex transceivers equipped with a GPS disciplined oscillator.

To a certain degree, an out-of-the-box KiwiSDR can do this if properly set-up:  With a good, reliable GPS signals and when placed within a temperature-stable environment (e.g. temperature change of 1 degree C or so during the time of the observation) they can be stable enough to provide useful data - but there is no guarantee of such.

To remove such uncertainty a GPS-based frequency reference is often applied to the KiwiSDR - often in the form of the Leo Bodnar GPS reference, producing a frequency of precisely 66.660 MHz.  This combination produces both stable and accurate results.  Unfortunately, if you don't already have a KiwiSDR, you probably aren't going to get one as the original version was discontinued in 2022:  A "KiwiSDR 2" is in the works, but there' no guarantee that it will make it into production, let alone be available in time for the April, 2024 eclipse. 

Figure 2:
The RX-888 (Mk2) - a simple and relatively inexpensive
box that is capable of "inhaling" all of HF at once.
Click on the image for a larger version.

The RX-888 (Mk2)

A suitable work-around has been found to be the RX-888 (Mk2) - a simple direct-sampling SDR - available for about $160 shipped (if you look around).  This device has the capability of accepting an external 27 MHz clock (if you add an external cable/connector to the internal U.FL connector provided for this purpose) in which it can become as stable and accurate as the external reference.

This SDR - unlike the KiwiSDR, the Red Pitaya and others - has no onboard processing capability as it is simply an analog-to-digital coupled with a USB3 interface so it takes a fairly powerful computer and special processing software to be able to handle a full-spectrum acquisition of HF frequencies.

Software that is particularly well-suited to this task is KA9Q-Radio (link).  Using the "overlap and save" technique, it is extraordinarily efficient in processing the 65 Megasamples-per-second of data needed to "inhale" the entire HF spectrum.  This software is efficient enough that a modest quad-core Intel i5 or i7 is more than up to the task - and such PCs can be had for well under $200 on the used market.

KA9Q-Radio can produce hundreds of simultaneous virtual receivers of arbitrary modes and bandwidths which means that one such virtual receiver can be produced for each WSPR frequency band:  Similar virtual receivers could be established for FT-8, FT-4, WWV/H and CHU frequencies.  The outputs of these receivers - which could be a simple, single-channel stream or a pair of audio in I/Q configuration - can be recorded for later analysis and/or sent to another program (such as the WSJT-X suite) for analysis.

Additionally, using the WSPRDaemon software, the multi-frequency capability of KA9Q-Radio can be further-leveraged to produce not only decodes of WSPR and FST4W data, but also make rotating, archival I/Q recordings around the WSPR frequency segments - or any other frequency segments (such as WWV, CHU, Mediumwave or Shortwave broadcast, etc.) that you wish.

Comment:  I have written about the RX-888 in previous blog posts:

  • Improving the thermal management of the RX-888 (Mk 2) - link 
  • Measuring signal dynamics of the RX-888 (Mk 2) - link

Full-Spectrum recording

Yet another capability possible with the RX-888 (Mk2) is the ability to make a "full spectrum" recording - that is, write the full sample rate (typically 64.8 Msps) to a storage device.  The result are files of about 7.7 gigabytes per minute of recording that contain everything that was received by the RX-888, with the same frequency accuracy and precision as the GPS reference used to clock the sample rate of the '888.  

What this means is that there is the potential that these recordings can be analyzed later to further divine aspects of the propagation changes that occurred during, before and after the eclipse - especially by observing signals or aspects of the RF environment itself that one may not have initially thought to consider:  This also can allow the monitoring of the overall background noise across the HF spectrum to see what changes during the eclipse, potentially filling in details that might have been missed on the narrowband recordings.

Because such a recording contains the recordings of time stations (WWV, WWVH, CHU and even WWVB) it may be possible to divine changes in propagation delay between those transmit sites and the receive sites.  If a similar GPS-based signal is injected locally, this, too, can form another data point - not only for the purposes of comparison of off-air signals, but also to help synchronize and validate the recording itself.

By observing such a local signal it would be possible to time the recording to within a few 10s of nanoseconds of GPS time - and it would also be practical to determine if the recording itself was "damaged" in some way (e.g. missed samples from the receiver):  Even if a recording is "flawed" in some way, knowing the precise location an duration of the missing data allows this to be taken into account and to a large extent, permit the data "around" it to still be useful.

Actually doing it:

Up to this point there has been a lot of "it's possible to" and "we have the capability of" mentioned - but pretty much everything mentioned so far was used during the October, 2023 eclipse.  To a degree, this eclipse is considered to be a rehearsal for the April 2024 event in that we would be using the same techniques - refined, of course, based on our experiences.

While this blog will mostly refer to my efforts (because I was there!) there were a number of similarly-equipped parties out in the fields and at home/fixed stations transmitting and receiving and it is the cumulative effort - and especially the discussions of what worked and what did not - that will be valuable in preparation for the April event.  Not to be overlooked, this also gives us valuable experience with propagation monitoring overall - an ongoing effort using WSPRDaemon - where we have been looking for/using other hardware/software to augment/improve our capabilities.

In Part 2 I'll talk about the receive hardware and techniques in more detail.


Stolen from ka7oei.blogspot.com

[END]


Saturday, January 22, 2022

Testing the FlyDog SDR (KiwiSDR "clone")

As noted in a previous entry of this blog where I discussed the "Raspberry Kiwi" SDR - a (near) clone of the KiwiSDR - there is also the "FlyDog" receiver - yet another clone - that has made the rounds.  As with the Raspberry Kiwi, it would seem that the sources of this hardware are starting to dry up, but it's still worth taking a look at it.

Note:  There is now the "Web-888" which is functionally similar to the RaspberySDR and the Flydog SDR, but reports indicate that unlike the Flydog, it performs reasonably well over the intended frequency range.  Unlike the KiwiSDR, its support (e.g. software updates, interaction with the designer, accessibility to useful features like TDOA) is somewhat limited.

I had temporary loan of a FlyDog SDR to do an evaluation, comparing it with the KiwiSDR - and here are results of those tests - and other observations.

Figure 1:
The Flydog SDR.  On the left are the two "HF" ports and
the port for the GPS antenna.  Note the "bodge" wires
going through the shielded area in the upper left.
The dark squares in the center and to its right are the A/D
converter and the FPGA.  The piece of aluminum attached
to the oscillator is visible below the A/D converter.
Click on the image for a larger version.

How is this different from the Raspberry Kiwi?

Because of its common lineage, the FlyDog SDR is very similar to the Raspberry Kiwi SDR - including the use of the same Linear Technologies 16 bit A/D converter - and unlike the Raspberry SDR that I reviewed before, it seems to report a serial number, albeit in a far different range (in the 8000s) than the "real" KiwiSDRs which seem to be numbered, perhaps, into the 4000s.

The most obvious difference between the FlyDog and the original KiwiSDR (and the Raspberry Kiwi) is the addition of of a second HF port - which means that there is one for "up to 30 MHz" and another that is used for "up to 50 MHz" - and therein lies a serious problem, discussed below.

Interestingly, the FlyDog SDR has some "bodge" wires connecting the EEPROM's leads to the bus - and, unfortunately, these wires, connected to the digital bus, appear to run right through the HF input section, under the shield!  Interestingly, these wires might escape initial notice because they were handily covered with "inspection" stickers. (Yes, there were two stickers covering each other - which was suspicious in its own right!)  To be fair, there's no obvious digital "noise" as a result of the unfortunate routing of these bodge wires.

Why does it exist?

One would be within reason to ask why the FlyDog exists in the first place - but this isn't quite clear.  I'm guessing that part of this was the challenge/desire to offer a device for a the more common, less-expensive and arguably more capable Raspberry Pi (particularly the Pi 4) - but this is only a guess.

Another reason would have been to improve the performance of the receiver over the KiwiSDR by using a 16 bit A/D converter - running at a higher sampling rate - to both improve dynamic range and frequency coverage - this, offering usable performance up through the 6 meter amateur band.  

Unfortunately, the Flydog does neither of these very well - the dynamic range problem being the same as the Raspberry Kiwi in the linked article compounded by the amplitude response variances, choice of amplifier device and frequency stability issues discussed later on.

Observations:

Getting immediately to one of the aspects of this receiver, I'll discuss the two HF ports. Their basic nature can be stated in two words:  Badly implemented.

When I first saw the FlyDog online with its two HF ports, I wondered "I wonder how they selected between the two ports - with a small relay, PIN diodes, or some sort of analog MUX switch, via hardware?" - but the answer is neither:  The two ports are simply "banged" together at a common point.

When I heard this, I was surprised - not because of its simplicity, but because it's such a terrible idea.  

As a few moments with a circuit simulator would show you, simply paralleling two L/C networks that cover overlapping frequency ranges does not result in a combined network sharing the features/properties of the two, but a terrible, interacting mess with wildly varying impedances and the potential for huge variations of insertion loss.

The result of this is that the 30 MHz input is, for all practical purposes, unusable, and its existence seriously compromises the performance of the other (0-50 MHz) port.  Additionally, if one checks the band-pass response of the receiver using a calibrated signal generator against the S-meter reading, you will soon realize that the resulting frequency response across the HF spectrum is anything but flat.

For example, one will see a "dip" in response (e.g. excess loss) around 10 MHz on the order of 20 dB if you put a signal into the 50 MHz port, effectively making it (more or less) unusable for the 30 meter amateur band and the 31 meter shortwave broadcast band.  Again, there is nothing specifically wrong with the low-pass filter networks themselves - just the way that they were implemented:  You can have only one such network connected to the receiver's preamplifier input at a time without some serious interaction!

Work-around:

Having established that, out-of-the-box, that the FlyDog has some serious issues when used as intended on HF, one might be wondering what can be done about it - and there are two things that may be done immediately:

  • Do microsurgery and disconnect one of the HF input ports.  If you have the skills to do so, the shield over the HF filter may be unsoldered/removed and the circuit reverse-engineered enough to determine which component(s) belong to the 30 MHz and 50 MHz signal paths - and then remove those component(s).  If you wish to retain 6 meter capability, disconnect the 30 MHz port.  Clearly, this isn't for everyone!
  • Terminate the unused port.  A less-effective - but likely workable alternative - would be to attach a 50 ohm load to the unused port.  On-bench testing indicated that this seemed to work best when the 50 MHz port was used for signal input and the 30 MHz port was connected to a 50 ohm load:  The frequency of the most offensive "null" at about 10 MHz shifted down by a bit more than 1 MHz into the 9 MHz range and reduced in depth, allowing still-usable response (down by only a few dB) at 10 MHz, and generally flattening response across the HF spectrum:  Still not perfect, but likely to be adequate for most users.  (In testing, the 30 MHz port was also shorted, but with poorer results than when terminated.) 

In almost every case, the performance (e.g. sensitivity) was better on the 50 MHz port than the 30 MHz port, so I'm at a loss to find a "use case" where its use might be better - except for a situation where its lower performance was outweighed by its reduced FM broadcast band rejection.

This issue - which is shared with the RaspberryKiwi SDR - is that the low-pass filter (on the 50 MHz port) is insufficient to prevent the incursion of aliases of even moderately strong FM broadcast signals which appear across the HF spectrum as broad (hundreds of kHz wide) swaths of noise with a hint of distorted speech or music.  This is easily solved with an FM broadcast band filter (NooElec and RTL-SDR blog sell suitable devices) - and it is likely to be a necessity.

Other differences:

  • Lower gain on the FlyDog SDR:  Another difference between the FlyDog and KiwiSDR is the RF preamplifier.  On the KiwiSDR and Raspberry Kiwi, a 20 dB gain amplifier (the LTC6401-20) is used, but a 14 dB gain amplifier (LTC6400-14) is used instead - a gain reduction of about 6 dB, or one S-unit - and the effects of this are evident in the performance as described below.  Was this intentional, a mistake, or was it because the 14 dB version was cheaper/more available?
From a purely practical stand point, this isn't a huge deal as gain may be added externally - and it's generally better to have a too-little gain in a system and add it externally rather than to try to figure out how to reduce gain in a system with too much without impacting noise performance.
 
As it is, the gain of the receiver is insufficient to hear the noise floor of an antenna system in a "rural quiet" station on 20 meters and above (when the bands are closed) without amplification.  This also means that it is simply deaf on 10 and 6 meters, requiring additional filtering and amplification if one wishes to use it there for weak signal work.  The KiwiSDR and Raspberry SDRs have a similar issue, of course, but the additional 6 dB gain deficit of this receiver exacerbates the problem.
 
To put this in perspective, it would take about 20 dB of external gain to allow this receiver to "hear" the 10 meter noise floor at a "very quiet" HF site - but adding that much gain has its own issues - See the article "Revisiting the Limited Attenuation High Pass Filter" - LINK.
  • "X1.5/X1.0" jumper:  There is, on the silkscreen, indication of a jumper that implies the changing of the gain from "1.5" to "1.0" when J1 is bridged.  I didn't reverse-engineer the trace, but it appears to adjust the gain setting of the LNA of the A/D converter - and sure enough, when jumpered, the gain drops by about 4 dB - precisely what a "1.5x" factor would indicate.
Despite the gain reduction, the absolute receiver sensitivity was unchanged, implying that the system's noise floor is set either by the LNA itself (the LTC6400-14) or noise internal to the the A/D converter.  If there's any beneficial effect at all I would expect it to occur during high signal conditions, in which case the "1.0" setting might make it slightly more susceptible to overload.
  •  "Dith/NA" jumper:  Also on the board is a jumper with this nomenclature marked J2 - and this (apparently) disables the A/D converter's built-in "dither" function - one designed to reduce spurious/quantization effects of low-level signals on the A/D converter, which defaults to "on" with the jumper removed as shipped.   Although extensive testing wasn't done, there was no obvious difference with this jumper bridged or not - but then, I didn't expect there to be on a receiver where the noise limit is likely imposed by the LNA rather than the A/D converter itself.
  • Deaf GPS receiver:  I don't know if it's common to these units, but I found the Flydog being tested to be very insensitive to GPS signals as compared to other devices (including Kiwi and Raspberry SDRs) that I have around, requiring the addition of gain (about 15dB) to the signal path to get it to lock reliably.
This issue has apparently been observed with other FlyDog units and it is suspected that a harmonic of a clock signal on the receive board may land close enough to the GPS frequency to effectively jam it - but this is only a guess.

Clock (in)stability:

The Flydog SDR uses a 125 MHz oscillator to clock the receiver (A/D converter) - but there is a problem reported by some users:  It's a terrible oscillator - and it's bad enough that it is UNSUITABLE for almost any digital modes - particularly WSPR, FT-8, and FT-4 - to name but a few unless the unit is in still air and in an enclosure that is very temperature-stable.

Figure 2:
Stability of the "stock" oscillator in the Flydog at 125 MHz in "still" air, on the workbench.  The
amount of drift - which is proportional to the receive frequency - makes it marginally usable for
digital modes and is too fast/extreme to be GPS-corrected.
Click on the image for a larger version.

Figure 2, above, is an audio plot from a receiver (a Yaesu FT-817) loosely coupled and tuned to the 125 MHz oscillator on the Flydog's receive board:  Due to the loose coupling (electrical and acoustic), other signals/noises are present in the plot that are not actually from the Flydog.  The horizontal scale near the top has 10 Hz minor divisions and the red has marks along the left side of the waterfall represent 10 seconds.

From this plot we can see over the course of about half a minute the Flydog's main receiver clock moved well over 50 Hz, representing 5 Hz at 12.5 MHz or 1 Hz at 2.5 MHz.  With this type of instability, it is probably unusable for WSPR on any band above 160 meters much of the time - and it is likely only marginally usable on that band as WSPR can tolerate only a slight amount of drift, and that's only if its change occurs in about the same time frame as the 2 minute WSPR cycle.  The drift depicted above would cause a change of 1 Hz or more on bands 20 meters and above within the period of just a few WSPR - or FT8 - symbols, rendering it uncopiable.

"The Flydog has GPS frequency correction - won't this work?"

Unfortunately not - this drift is way too fast for that to possibly work as the GPS frequency correction works over periods of seconds. 

What to do?

While replacing the 125 MHz clock oscillator with another device (I would suggest a crystal-based oscillator rather than a MEMs-based unit owing to the former's lower jitter) or apply a stabilized, external source (e.g. a Leo Bodnar GPS-stablized signal source) are the best options, one can do a few things "on the cheap" to tame it down a bit.

While on the workbench, I determined that this instability appeared to be (pretty much) entirely temperature-related, so two strategies could be employed:

  • Increase the thermal mass of the oscillator.  With more mass, the frequency drift would be slowed - and if we can slow it down enough, large, fast swings might be damped enough to allow the GPS frequency correction to compensate.  With a slow enough drift, the WSPR or FT-8 decoders may even be able to cope without GPS correction.
  • Thermally isolate the oscillator.  Because it's soldered to the board, this is slightly difficult so our goal would be to thermally isolate the mass attached to the oscillator.

To test this idea I added thermal mass:  I epoxied a small (12x15mm) piece of 1.5mm thick aluminum to the top of the oscillator itself.  The dimensions were chosen to overlap the top of the oscillator while not covering the nearby voltage regulator, FPGA or A/D converter and the thickness happens to be that of a scrap piece of aluminum out of which I cut the piece:  Slightly thicker would be even better - as would it being copper.

The epoxy that I used was "JB Weld" - a metal-filled epoxy with reasonable thermal conductivity, but "normal" clear epoxy would probably have been fine:  Cyanoacrylate ("CA" or "Super" glue) is NOT recommended as it is neither a good void filler or thermal conductor.

Comment:  If one wishes to remove a glued-on piece of metal from the oscillator during experimentation, do not attempt to remove it physically as this would likely tear it from and damaging the circuit board, but slowly heat it with a soldering iron:  The adhesive should give way long before the solder melts.

The "thermal isolation" part was easy:  A small piece of foam was cut to cover the piece of aluminum - taking care to avoid covering either the FPGA or the A/D converter, but because it doesn't produce much heat - and is soldered to the board itself - the piece of foam also covered the voltage regulator.

The result of these two actions may be seen in the plot below:

Figure 3:
The stability of the oscillator after the addition of the thermal mass and foam.  Still not great,
but more likely to be usable.  (The signal around 680-700 Hz is the one of interest.)
Click on the image for a larger version.
 
Figure 3, above, shows the result, the signal of interest being that around 680-700 Hz and again, the loose coupling resulted in other signals being present besides the 125 MHz clock.
 
Over the same 30 second period the drift was reduced to approximately 10 Hz - but more importantly, the period of the frequency shift was significantly lengthened, making it more likely that drift correction of the onboard GPS frequency stabilization and/or the WSPR/FT8 decoding algorithm would be able to cope.  This is still not great, but it's far "less terrible".
 
Not mentioned thusfar is that adding a cooling fan may dramatically impact the frequency stability of the Flydog":  I did not put the test unit in an enclosure or test it with a fan blowing across it - with or without the added thermal mass and isolation - so that is territory yet to be explored.
 
Conclusion:
 
Is the Flydog SDR usable?

Out-of-the-box and unmodified:  Only marginally so.  While the issue with frequency stability is unlikely to be noticed unless you are using digital modes, the deep "notch" around 10 MHz and lower sensitivity are likely to be noticed - particularly in a side-by-side comparison with a KiwiSDR.

IF you are willing to do a bit of work (remove the components under the shield connecting the 30 MHz receiver input, modify/replace the 125 MHz oscillator - or use an external frequency source) the Flydog can be a useful device, provided that a bit of gain and extra filtering (particularly to remove FM broadcast signals' ingress past the low-pass filter) is appropriately applied.

Finally, it must be noted that the Flydog - like the Raspberry Kiwi (which works fine, out of the box, by the way) is a "clone" of the original KiwiSDR.  Like the Raspberry Kiwi, there are factors related to the support available to it as compared to the KiwiSDR:  The latter is - as of the time of posting - an ongoing, actively-supported project and there are benefits associated with this activity whereas with the clones, you are largely on your own in terms of software and hardware support.

For more information about this aspect, see a previous posting:  Comparing the "KiwiSDR" and "RaspberrySDR" software-defined receiver" - link.
 
Comment:
I have read that the Flydog SDR is no longer being manufactured - but a quick check of various sites will show it (or a clone) still being available as of the date of the original posting of this article - but its presence is fading.  The Flydog is easily identified by the presence of three SMA connectors (30 MHz, 50 MHz and GPS) while the more-usable Raspberry Kiwi SDR has just two and is a black case with a fan. 
Unless you absolutely must have 6 meter coverage on your Kiwi-type device (doing so effectively would be an article by itself) I would suggest seeking out and obtaining a Raspberry Kiwi - but if you don't care about 6 meters, the original KiwiSDR is definitely the way to go for the many reasons mentioned near the end of the aforementioned article.
 
This page stolen from ka7oei.blogspot.com
 
[End]

Sunday, December 20, 2020

Locking the Icom IC-910H to an external 10 MHz (GPS) reference

In late 2009 my friend Bryan, W7CBM, came to me with a project that he had in mind:  "Can we lock my Icom IC-910H to my 'Z-box'?" - in other words, could the 10 MHz output from his Z-3801 GPS Disciplined Oscillator - known to be accurate to better than one part in 100 million - be used to lock his tri-band (2 meters, 70cm and 23cm) all-mode radio to frequency?

Figure 1:
The front panel of the modified Icom IC-910H.
Click on the image for a larger version.

During the initial discussion he'd brought with him an article where Rex, VK7MO, had done a similar thing (see the article on the VK3HZ site from the web archive - link) using an external box to provide a precise version of the radio's 30.2 MHz reference - but he wanted it to be contained entirely within the radio.  

In looking at the requirements and designing the circuit in my head, I decided that we could make it simpler, smaller and easier to use - and with these ideas in mind, I wrote down the specifications for a 30.2 MHz fundamental-mode crystal and he sent an order off to International Crystal.

About 2 months later - in early 2010 - we got back together in my ham shack, crystal in hand, and it was then that I decided that I'd better get around to designing the circuit, so I scribbled the vestiges of a schematic onto a piece of paper and built several circuits that would fit into the aluminum box that Bryan had milled out. At the end of about 3 hours we had a circuit that would faithfully lock the 30.2 MHz crystal oscillator to a 10 MHz external source.  This circuit was fairly small and consisting of two boards:  The amplifier/counter/PLL section wired on prototype board while the VCXO itself was constructed "dead bug" on to a piece of copper-clad PC board material as seen in Figure 3.

"Patience is a virtue - but this is ridiculous!"

And that was where it stopped.  In a case of "out of sight, out of mind", "other fish to fry" - or any number of other excuses - the partly-completed lock unit stayed on a shelf in Bryan's ham shack for a decade, in plain sight.  When I'd go over to his shack, I'd see it as a reminder of a project yet to be completed, but it had become a fixture and was often overlooked.

Until recently.

As it happened, we both had more time available with the onset of winter and we carved out Wednesday evenings to get together to work on various projects and this, being the most senior and nearest completion, came to the top of the pile.  Over the course of a couple evenings we worked on it, having to pause occasionally to get a part, modify some aspect the circuit's implementation, do some physical machine work, or because we ran out of time - but it is now complete!

How it works:

The schematic diagram is depicted in Figure 2, below.

Figure 2:
The schematic of the lock unit for the IC-910H.  This schematic is a reverse-engineered  version of the (now lost) originals and is likely to be mostly correct.
Click on the image for a larger version.

The VCXO:

The heart of the unit is Y201, a 30.2 MHz fundamental mode crystal in a Colpitts oscillator.  Using D201, a varactor diode (approx. 5-20pF) its frequency is made variable, the center of the electronic tuning range being adjusted by trimmer capacitor C201.  The output of the oscillator is buffered by emitter-follower Q202 to isolate the oscillator from the load.

The 30.2 MHz output goes two places:  To Q103, the 30.2 MHz amplifier, and also to a low-pass filter consisting of C208, L201 and C209 which is then output to the IC-901H's synthesizer.

The 10 MHz chain:

Figure 3:
The lock unit under test prior to installation in the case.
Unfortunately, this is the only picture that I got
of the oscillator portion.  The small PCB is the RF sense
circuit, built using SMD components by Bryan.
Click on the image for a larger version.

The 10 MHz input - which can come from a GPS Disciplined Oscillator (GPSDO), a 10 MHz oven-controlled oscillator (OCXO) or a Rubidium source - is input to and amplified by Q101 to a logic level and buffered by U1a, one section of a 74HC86 quad XOR gate.  

The output of U1a is also applied to a 74HC40103 which is wired as a divide-by-50 counter to yield a 200 kHz output - and this is applied to U2a, a 74HC7474 divide-by-two counter to yield a 100 kHz square wave.

The RF sense circuit:

A sample of the 10 MHz signal from U1a is also applied to the input of Q301, which amplifies it:  This RF gets rectified to DC by D301 and D302 and its presence turns on Q301 which pulls R303 to ground and turns off Q301 which is connected to U301 - a 5 volt regulator that is connected to the +5 volt lead of the original TCXO in the IC-910H:  In this way, the internal oscillator in the IC-910H is enabled when there is no 10 MHz signal, but disabled when it is connected.

Also connected to the emitter of Q301 is PNP power switch Q203 which, when R208 is pulled to ground when Q301 turns off, applies power to U201 - a 9 volt regulator - to power up the 30.2 MHz oscillator when the external 10 MHz source is applied, preventing both oscillators from being turned on at the same time.

The Harmonic mixer: 

A sample of the 30.2 MHz signal applied to Q103 is amplified and applied to U1b, another XOR gate buffer, which is then applied, along with the 10 MHz from U1a, into U1d - yet another XOR gate.  This gate acts as a harmonic mixer:  By virtue of the multiplying action of the XOR gate, the 3rd harmonic of the 10 MHz input mixes with the 30.2 MHz input and at the output of this gate is a small amount of the difference frequency - 200 kHz - which easily is filtered by L101 and C103 and amplified by Q102.

Figure 4:
The unit in place - final test.  SMA connectors are used for
10 MHz input and 30.2 MHz output and
feedthrough capacitors are used for the 13.8 volt DC
input and the switched 5 volts for the TCXO.
Click on the image for a larger version.

The use of a harmonic mixer is a very old technique and it has an advantage of simplicity over a more "conventional" digital divider network - albeit more "analog".

A more "conventional" way of doing this might be to divide both the 30.2 MHz and 10 MHz signals down to a common sub-multiple - say, 200 kHz - but to do so would require both a divide-by-50 (to take the 10 MHz down to 200 kHz) and a divide-by-151 (to take the 30.2 MHz down to 200 kHz).  This method works, but adds the a bit of hardware (an additional divider) and, more importantly, these divider steps and subsequent comparisons reduce the PLL loop gain.

By contrast, directly using the 3rd harmonic of the 10 MHz reference to mix with the 30.2 MHz, the 200 kHz difference (ultimately 100 kHz - see below) may be used directly - and loop gain preserved, potentially improving PLL performance and simplifying the design.

The comparison with the reference frequency:

The 200 kHz "difference" signal from the harmonic mixer, filter and amplifier is applied to the divide-by-to circuit U2d to yield to yield a 100 kHz square wave.  The 100 kHz square wave from the divided-down 10 MHz reference signal and that from the 100 kHz "difference" signal are applied to U1c, an XOR gate, which is used as a phase detector.  As the phases of the 100 kHz from the reference signal and that of the difference signal "slide" past each other, the voltage - smoothed by R107 and C107 - will vary from 0 to 5 volts.  If, as an example, C201 in the 30.2 MHz crystal oscillator is adjusted so that 2.5 volts applied to the "VCXO Tune" line, this will cause the crystal oscillator to lock to the reference when the two signals are 90 degrees apart, being steered back onto frequency if they start to drift apart.  

I chose to use an XOR gate as a phase detector over a conventional phase/frequency detector because other than the desired DC component, the lowest-frequency component from its output cannot be lower than the comparison frequency - 100 kHz in this case, with the vast majority of the energy being 200 kHz and harmonics.  In comparison, many of the flip-flop phase/frequency detectors tend to output "occasional" pulses at very low frequency when at/near lock, which are nearly impossible to filter out.  There is a minor penalty, though:  An XOR gate phase detector requires use of 50% duty cycle square waves to work most efficiently, so each of its inputs is divided-by-two by a single 74HC74 dual flip-flop.

Figure 5:
Power connection to the original TCXO - L511 was removed.
Click on the image for a larger version.

Interfacing to the IC-910:

Switching the internal oscillator:

Bryan's IC-910 has the standard TCXO - X512 (the "CR-452") rather than the "High Stability" option (the "CR-293").  Either unit operates at 30.2 MHz, but there is a difference:  The standard TCXO operates from 5 volts while the high stability unit operates directly from the 13.8 volt supply.  Because the internal oscillator must be disabled when another source is applied, one will need to do one of two things, depending on how the radio is configured:

  • Because this radio had the standard TCXO (CR-452 a.k.a. X512), inductor L511 (on the IC-910H's PLL board) was removed to make the power externally switchable and L510 and C501 (the "L510" on Figure 2, above) was connected to power X512.  It is this voltage that is switched by Q303 and regulated by U301 to provide switchable 5 volts.
  • If the "High Stability" option ("CR-293") had been present (as described in the VK7MO case) we would have interrupted the 13.8 volt supply at C511/C512 (on the IC-910H PLL board) and switched it using Q303 directly rather than regulated to 5 volts by U301.  Comment:  It is unknown how much current the high stability oscillator consumes so a slight modification of the Q302 circuit might be required to do this.

Another difference between the way the two oscillators are interfaced appears to have something to do with the output level.  The standard TCXO outputs an RF signal of about 1.2 volts peak-to-peak while it can be seen from the IC-910H service manual that R515 is in series with the output of the high stability oscillator - presumably to reduce its level.

Injecting the locked 30.2 MHz signal:

Figure 6:
Connection of the 30.2 MHz to the PLL board showing
 the added D501 and L502.
Click on the image for a larger version.
Initially we simply connected the external 30.2 MHz in parallel with the output of the original TCXO, hoping that it would go "Hi-Z" when it was powered down - but that did not work:  When the original oscillator was powered down, its output was effectively shorted to ground, dropping the 30.2 MHz signal down to about 100 millivolts, so this signal was applied, instead, to the junction of variable resistor R570 and R572, using R570 to isolate it from the powered-down oscillator.  For this reason, diode D501 was implemented:  This diode - and L502 to provide a DC return - are connected directly at the junction of R570/R572:  When the external reference is activated, diode D501 is biased via R207, turning it on and connected the output of the 30.2 MHz VCXO to the IC-910H's PLL circuit.

If the external reference is not activated, Q203 - the VCXO power switch - is off and no voltage is applied to diode D501 via R207 and it remains "off", effectively isolating the original oscillator from the powered-down VCXO:  By placing the diode at the end of the coax, farthest from the external reference, there is minimal effect on the signal by that coax to the IC-910H's internal oscillator when the external reference is not being used.

Mechanical installation within the IC-910H:

Figure 7:
The back panel of the modified IC-910H.  The added BNC
connector is in the lower-left corner - the location of the
original ground screw, now relocated to the opposite corner.
Click on the image for a larger version.
Bryan had machined the box out of a chunk of aluminum back in 2010, sizing it to just fit (in all three dimensions) on the lid of the PLL unit.  As originally equipped, there are two brackets screwed down to the lid - apparently for the mounting of an optional voice synthesizer and DSP board - but these brackets were removed to make room.  Two SMA connectors were then mounted to the new box - one for the 10 MHz input and the other for the 30.2 MHz output, into the PLL board.  A pair of 1000pF feedthrough capacitors provide passage for the DC power into the box and the switched 5 volt output to the original TCXO on the PLL board.

Not shown (because I forgot to take the photo) is the connection to the switched 13.8 volt supply:  This was connected to the same point on the PLL board as depicted in the VK7MO document mentioned above - except, of course, that the trace did not need to be cut as would have been necessary to switch the power if the high-stability oscillator had been fitted.

The hole on the rear panel for the ground post was drilled out to permit mounting of a single-hole BNC connector with an already-fitted cable with attached SMA connector as can be seen in Figure 4.  This location for the BNC connector was slightly problematic as it somewhat blocked the screw to hold down the cover, but maneuvering of the connector, the use of tweezers and a small-diameter screwdriver permitted its installation.  In the opposite corner (the far-right in Figure 7) a new hole was drilled and tapped for the grounding post.

Spectral purity:

There was a small of concern that the spectral purity of the transceiver with the new reference oscillator would be worse than the original as I'd made no attempt to construct a very low noise oscillator (e.g. a lightly-loaded Butler or similar) so I compared the spectrum with both the internal oscillator and the "new", externally-locked oscillator on the various bands  - particularly on 23cm.

Figure 8:
Transmitter spectrum +/-500 kHz of a CW
carrier on 23cm as seen on an HP-8562A.
Click on the image for a larger version.


On 2 meters and 70cm, very weak (-70dBc) spurs at +/- 200 kHz - the main component of the output of the phase detector - were noted, barely above the broadband noise floor of the transmitter itself - but these were pretty much absent on 23cm as can be seen in Figure 8.  If these had been of concern, it would have been easy to further-improve the loop filter - which is currently a very simple R/C design as evidenced by Figure 2.  The fact that the plot in Figure 8 was made with the analyzer's resolution bandwidth set to 300 Hz should be an indication as to how low these 200 kHz components really are!

Another possible concern was closer-in phase noise:  Would various noise sources of the new circuits (VCXO phase noise, counter jitter, 1/F noise from regulators, loop noise, etc.) cause notable degradation?

Figure 9 gives a clue:  For this test, trace "A" is the original TCXO and trace "B" (the slightly fainter one corresponding with the peak on the right) was produced using the new, externally-locked reference.  As can be seen, the "close-in" phase noise performance of this radio isn't super great, anyway, but the two "noise humps" on either side of the carrier appear to be identical.

This trace also shows a slight difference in frequency, with the original TCXO (the peak on the left) being slightly low in frequency compared to the GPS-referenced, externally locked version - both showing identical amounts of phase noise indicating that the IC-910H is not degraded by this addition.

Figure 9:
A comparison of the close-in phase noise
using the original TCXO (left peak) and the
new, externally locked oscillator (right peak).
Click on the image for a larger version.
Conclusion:

Even thought it has been a long time in the making, this project is complete - and working as well as we hoped that it would.  I'm gratified that a mere decade ago, the circuit that I scribbled onto a piece of paper - and then built in one evening works just as it was expected, with no significant modification!

* * *

 P.S.  Alas, if you wanted to order a crystal, yourself, International Crystal Mfg. is no more, but custom crystals are still available via Quartslab - link, and Krystaly - link - to name but two places.

NOTE:  "Quartslab" stopped doing business in 2021 and "Klove" appears to have acquired the business - link.

(You would have to check with your chosen manufacturer to see if they will make a 30.2 MHz fundamental crystal, though - either that or modify the oscillator to use a 3rd overtone crystal.)

Comment:  Since this article was originally published, devices like the Leo Bodnar GPS reference link have become available that can produce the 30.2 MHz reference required by this radio directly.  This device uses GPS-based timing to set an oscillator to the desired frequency that is programmable - typically with accuracy in the range of 10E-10 or so:  In other words, it can directly synthesize the 30.2 MHz frequency needed by the IC-910H.

If you wish to generate a 30.2 MHz from a stable 10 MHz source that you already have, the Bodnar device really won't help you.

* * *

This page stolen from ka7oei.blogspot.com.

[End]